The SSH Guide
Everything you should now about SSH
Introduction
This guide covers SSH (Secure Shell), a protocol for secure communication and remote access between computers. It provides an overview of the SSH protocol and practical usage examples, such as generating keys, configuring server access, and managing users.
SSH Keys
- Public Key: Used for one-way encryption. It encrypts data that only the corresponding private key can decrypt. Share this key with servers you want to access.
- Private Key: Decrypts data encrypted with the public key, allowing secure access and communication. Store this key securely on your local machine and protect it with a strong passphrase. Never share your private key with anyone.
SSH Protocol
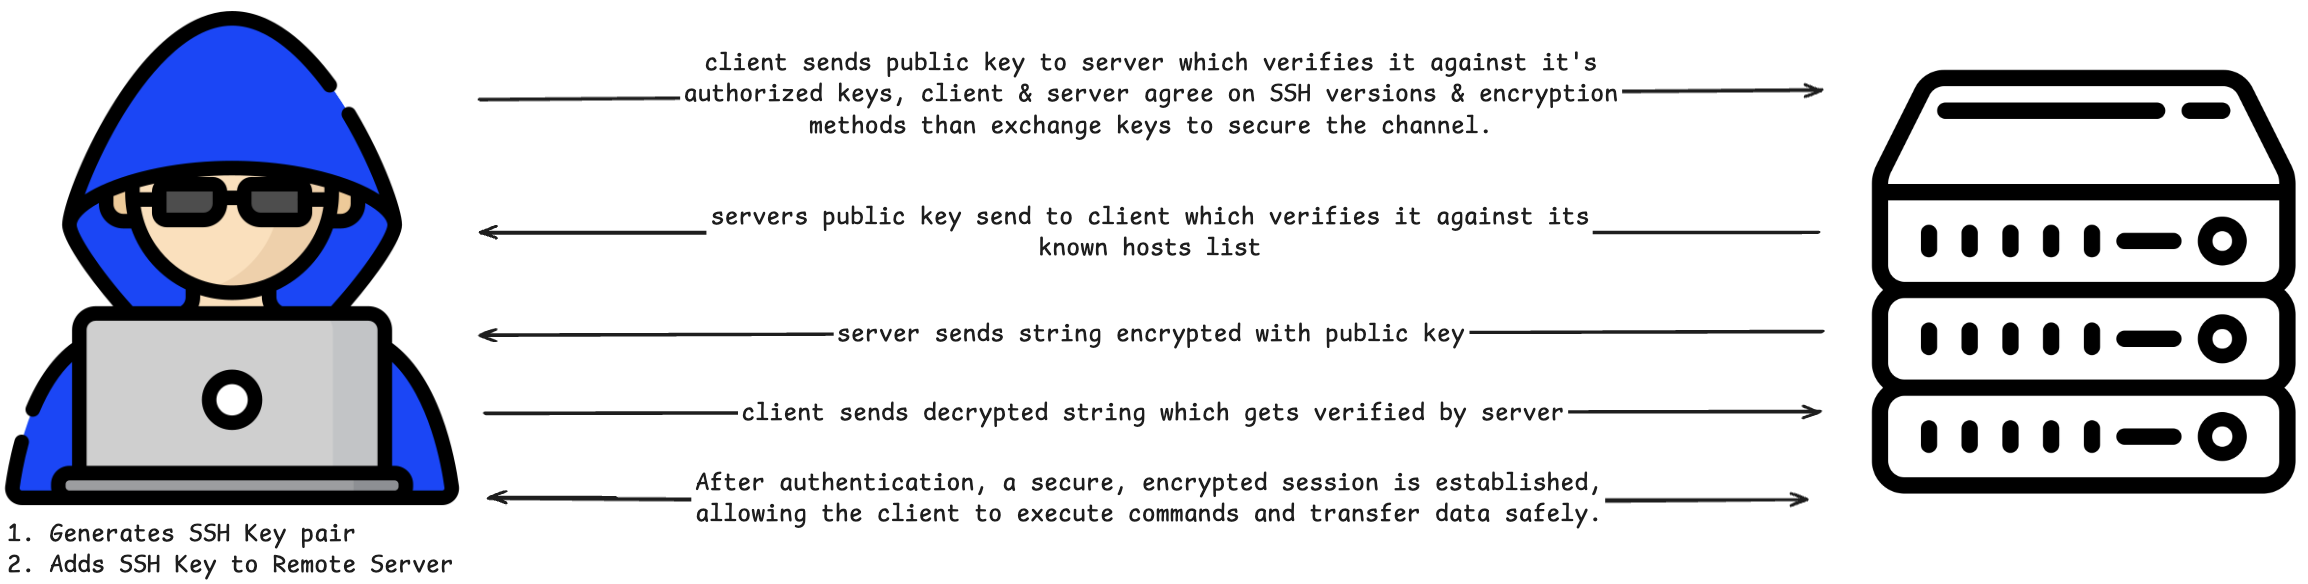
-
Client sends public key to server:
- The server checks this public key against its list of authorized keys to verify if the client is permitted to connect.
- The client and server agree on SSH protocol versions and encryption methods, then perform a key exchange to secure the channel.
-
Server sends its public key to client:
- The client verifies this key against its known hosts list to ensure the server is trusted.
-
Server sends a challenge (string) encrypted with the client's public key:
- This ensures that only the client with the corresponding private key can decrypt it.
-
Client decrypts the challenge and sends it back:
- The server verifies the decrypted string to confirm the client's identity.
-
Session Establishment:
- After successful authentication, a secure, encrypted session is established, allowing the client to execute commands and transfer data safely.
SSH Usage
- generate ssh-key in you terminal
1cd ~/.ssh
2
3ssh-keygen -t ed25519
4
5Enter file in which to save the key (/path/to/your/.ssh/id_ed25519): <project-name>
6
7Enter passphrase (empty for no passphrase): <CR> or enter any passphrase
8- add pbulic key to server (usually done via webinterface of hosting provider)
copy the public key
1cat ~/.ssh/<project-name>.pub
2- give permission to read privatekey-file
1chmod 400 ~/.ssh/<project-name>
2-
Allow network access via SSH
- Source IP: Any IPv4, Any IPv6
- Protocol: TCP
- Port: 22
-
Connenct to server via SSH
1ssh -i ~/.ssh/<project-name> root@<IPv4>
2
Managing SSH Users and Permissions
In this section, we'll cover managing users and permissions with SSH to ensure only authorized individuals access your servers, enhancing security.
- Create a non-root user with sudo privileges
1adduser <username>
2
3usermod -aG sudo <username>
4- Copy SSH key for new user
1mkdir -p /home/<username>/.ssh
2cp ~/.ssh/authorized_keys /home/<username>/.ssh/
3chown -R <username>:<username> /home/<username>/.ssh
4chmod 700 /home/<username>/.ssh
5chmod 600 /home/<username>/.ssh/authorized_keys
6- Test sudo access with the new user:
1su - <username>
2# with new user run
3sudo whoami  # Should return "root"
4- After confirming everything works, you should update the SSH configuration to disable root login:
1sudo vim /etc/ssh/sshd_config
2
Change or add these lines:
1PermitRootLogin no
2PasswordAuthentication no
3PubkeyAuthentication yes
4- Restart the SSH service:
1sudo systemctl restart ssh
2- Test new SSH connection in a new terminal window before logging out:
1ssh -i ~/.ssh/<project-name> <username>@<IPv4>
2